Backend Connectivity Guide
Introduction
This guide introduces how a URCap can handle network connections and communicate with external networks as well as peripherals using container backend contributions. It explores the available connection options for backend contributions and provides recommendations on the most suitable solutions for various practical use cases.
Types of connections
PolyScope X URCaps can contribute backend components within linux containers which provides many advantages, but sometimes also require some information and attention to make them work.
Although a backend contribution runs in isolation within a container, it can still access various peripherals and connect to external networks.
There are 3 media types available for connecting peripherals to a backend contribution:
Ethernet
USB devices
Robot Tool Connector
Configuring and making these devices available in a backend contribution is done through the URCap’s Manifest.yaml URCap descriptor
The local Ethernet (eth0) is always accessible within a backend contribution.
USB devices and the Tool Connector must be explicitly requested in the URCap manifest.
Connecting to the robot controller
An overview of the client interfaces available on the robot can be found here.
A backend contribution can communicate with the robots controller using sockets just like PolyScope 5 with an additional step as described in the following.
The first step is declaring the communication in the manifest file.
In this example the section “services” requests access to “urcontrol-primary”. Inside the container, the TCP connection can be established to urcontrol-primary:30001. That is hostname urcontrol-primary and port number 30001.
artifacts:
  containers:
    - id: "monitor"
      image: "monitor:latest"
      services:
        - service: urcontrol-primary
      ingress:
        - id: rest
          containerPort: 8888
          protocol: http
          proxyUrl: /
A list of available interfaces and a description on how to set it up can be found here.
Connecting to outside using the control box ethernet port
By default, a backend contribution can connect to the physical network outside the robot control box using the protocols TCP/IP or UDP/IP (layer 3+4).
Most standard protocols known from the Internet domain such as HTTP, HTTPS, e-mail protocols and many other protocols work this way.
Some fieldbus protocols and many other proprietary protocols are designed to work on a single LAN network and operate
without TCP/UDP/IP protocol overhead.
These protocols needs special attention. Ex: If you are working on an industrial fieldbus protocol implemented directly
on layer-2, it will need a special configuration in order to work from within the backend contributions container.
The solution for these special protocols is either to use a macvlan whereby communication is available on the normal
ethernet plug or an additional physical ethernet adaptor connected on the USB bus.
Both macvlan and physical adaptors will be introduced next. The integration is straight forward and the necessary steps
are laid out in the following section.
Connecting from outside using the control box ethernet port
Backend contributions often need to publish a REST API to be accessed either from a frontend component or from external equipment connected to the physical network.
A REST API is called with the HTTP(S) protocol using the standard HTTP methods post, get, put, delete to perform Create-Retrieve-Update-Delete (CRUD) operations. Data are usually exchanged in JSON/YAML/XML structured formats.
It is possible to configure the REST API in two ways in the URCap manifest.
ingress
This publishes the backend contributions REST API together with all other REST endpoints on port 80 of the control box. To create unique URCap URL’s we automatically add/<vendorid>/<urcapId>/<RestEndpoint>to the URL making it longer. The long prefix can be changed or removed before the request arrives in the container. Using a single ingress system makes sure cyber security issues are handled commonly for all REST APIs on the robot.exposePorts
This adds a communication port to the host making the REST API available on its private port.
This makes it easy to understand and get started with.
Port numbers are exclusive and needs to be distinct from ports used by other URCaps.
In case two URCaps uses the same port they cannot be running at the same time.
A number of system ports and robot ports are reserved and cannot be used. List of all ports used by UR available are available here.
In the following sections the ingress and exposePorts methods are described in details.
Serve REST API using ingress
In this example, the backend contribution is running a webserver on TCP port 52762, which will be available on the robot through port 80 mixed with other URCap REST APIs.
URL syntax will make sure REST APIs will not conflict.
curl http://<robot-ip>/universal-robots/exposed-rest/exposed-rest-backend/get-example
Inside the container this will be remapped by the proxyUrl and containerPort tags to the following request
http://<container-ip>:52762/get-example
artifacts:
  containers:
    - id: "exposed-rest-backend"
      image: "exposed-rest-backend:latest"
      ingress:
        - id: get-example
          containerPort: 52762
          protocol: http
          proxyUrl: /
Then implement a websocket/rest server in the URCap docker container (using flask or similar). For more details see Creating a container backend Contribution
Serve REST API using exposePorts
Enable external communication in the URCaps manifest.yaml exposePorts section
artifacts:
  containers:
    - id: ethernetip-backend
      image: ethernetip-backend:latest
      exposePorts:
        - id: explicit_messaging
          containerPort: 44818
          hostPort: 44818
          protocol: tcp
          externallyAvailable: true
Then implement a websocket/rest server in the URCap docker container on port 44818
Ingress or exposePorts which approach should I use
As mentioned above, it is possible to expose REST API’s and websocket using both Ingress and exposePorts.
In general you should always use the Ingress approach. This way you will benefit from any cyber security features
provided by the system and most importantly you will be certain that your URCaps URL’s will not collide with the system
or other URCaps URL’s.
When to make the exception and use exposePorts. If your URCap have to expose an API on a specific port or use a protocol not based on HTTP you will need to use exposePorts.
An example if you are implementing the OPC-UA protocol in a URCap and need to communicate via TCP protocol on port 4840. In this case exposePorts will be the solution. Another way to solve this is to use the OPC-UA over HTTP transport mechanism. This way you can use the ingress option. Further details are available here.
Another example is the fieldbus etherCAT. This protocol runs at layer-2 without IP/TCP/UDP and thus does not have a port number (TCP/UCP feature). EtherCAT should be implemented with macvlan or a separate physical ethernet adaptor. More information regarding this is available later on in this guide.
Communicating between frontend and backend
So far, we have seen examples of TypeScript code running in the HTML5 frontend as well as descriptions of backend container features.
REST
Communication between the two is mainly done using REST protocols with a JSON payload, which is widely known from most
single page websites.
If the robot is connected using ethernet, the frontend can communicate with remote REST API’s directly without a backend contribution in the middle.
If the frontend contribution need to do REST communication with a contributed backend, then create a backend
contribution and setup the REST API using Ingress, the following URL structure must be used:
http://servicetageway/vendorID/urcapID/containerID/ingressID/myUrl
WebSocket
When the communication is two-way by nature the rest need to be upgraded to websocket as shown below.
Once established websockets allow the container backend to send information to the html5 frontend as well as the other way in which the frontend sends information to the container.
ingress:
  - id: websocket-api
    containerPort: 8888
    protocol: websocket
    proxyUrl: /
ROS2
PolyScope X has extensive support for ROS2. This protocol is widely used in the robotics world and a detailed
description of ROS2 is available here.
A frontend contribution can use the ROS2Client API to communicate with a contributed backend ROS2 node, as shown in the simple-gripper sample of the SDK. In the same way a frontend contribution can communicate with the builtin Robot ROS2 interface, that much assembles the RTDE interface. See a description of the PolyScope X ROS2 interface here.
Communicating between URScript and backend
A common use case involves communicating with some peripheral from a running program. Examples include controlling an end effector or receiving input from a camera during program execution.
To achieve this, users must generate backend communication within the URScript that makes up the running program. URScript provides two simple methods for this:
ROS2: URScript supports communicating with the backend via ROS2, including backend contributions. For more details see ROS2 in URScript. The “simple-docker” sample demonstrates how a frontend contribution can generate URScript that communicates with a backend contribution using ROS2.
XML-RPC: URScript also allows calling XML-RPC functions on backend contributions. Refer to the URScript manual for guidance on using XML-RPC with URScript. The “simple-xmlrpc” sample showcases how a frontend contribution can generate URScript for XML-RPC calls and how to create a backend contribution exposing an XML-RPC interface.
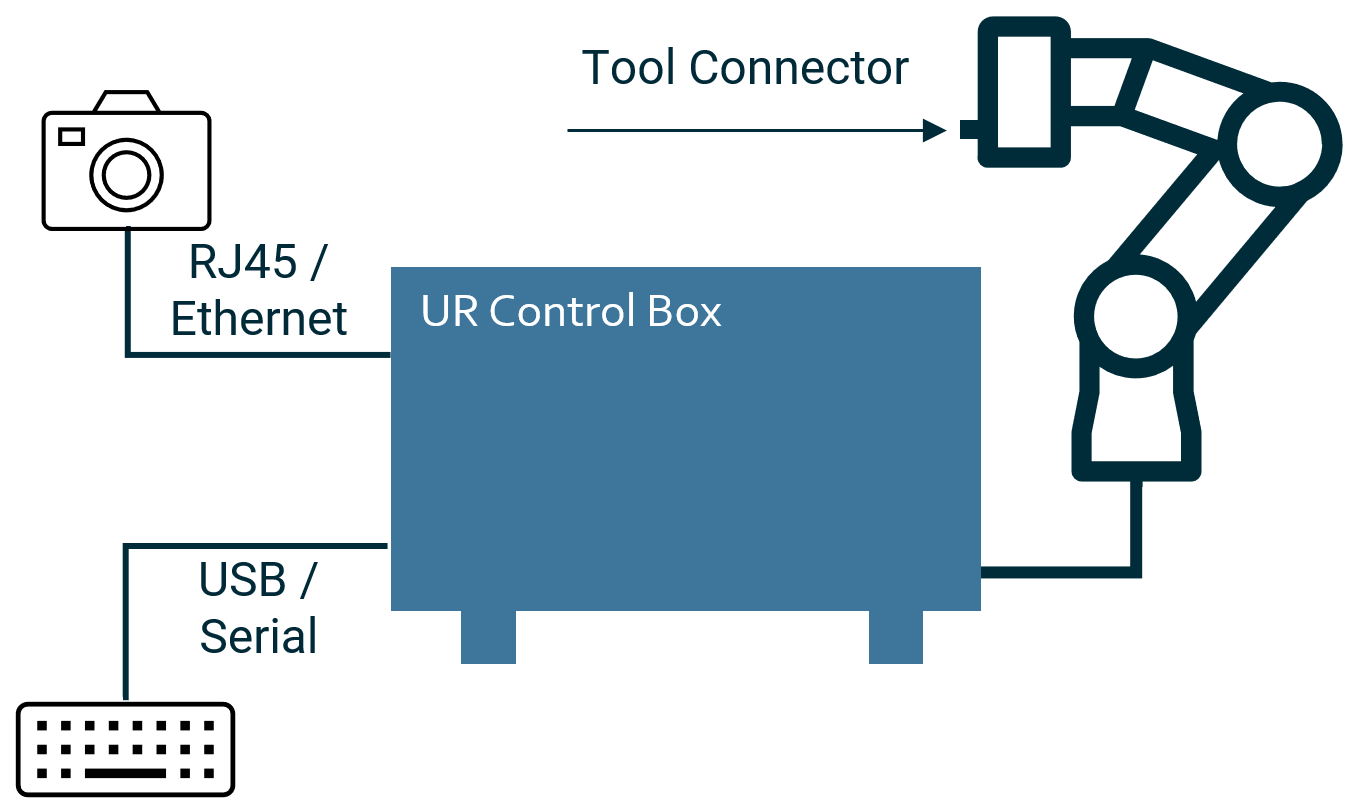
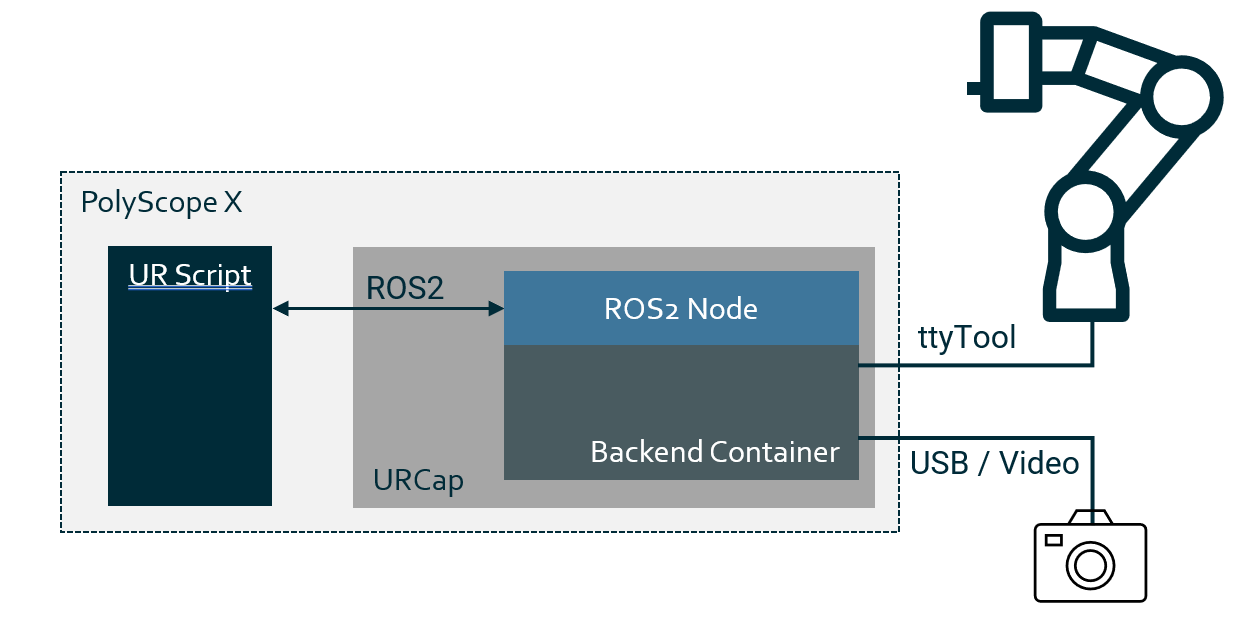
The figure below illustrates a generated URScript program that utilises ROS2 topics and services from URScript to interact with a backend contribution implemented as a ROS2 node. The backend contribution is connected to a camera via a USB connection enabling it to process and return data values to the running URScript program. Additionally, the backend contribution controls a gripper end effector by communicating through the Tool Connector. It should be mentioned that the Tool Connector can also be used directly from URscript see URScript manual.
Connecting using the Tool Connector
The Tool Connector, which is placed next to the tool flange of the robot arm, can also be accessed via a backend contribution.
This is how a URCap requests access to the tool connector using the URCap manifest:
artifacts:
  containers:
    - id: "gripper"
      image: "gripper:latest"
      devices:
        - type: ttyTool
This will result in the Tool Connector device being available in the container for reading and writing.
In the current implementation of the Tool Connector in backend contributions, the following special properties apply:
Shared access to the Tool Connector. All URCaps that request the Tool Connector will have access to it. This entails the risk of several contributions talking on the tool connector at the same time.
Configuration of the connection can only be done using script functions: “set_tool_communication”, “ set_tool_digital_output_mode”, “set_tool_voltage”
See the “simple-gripper” sample from the SDK, that demonstrates how to configure the Tool Connector in URScript generated in a frontend application node
Connecting outside using additional Network Interfaces
So far we have been looking at protocols running TCP/UDP/IP sharing the network bandwidth with robot network traffic running through the default ethernet port on the control box.
Some use cases require a different approach and PoyScope X implements a number of more advanced networking solutions which we will describe below.
Even though they are technically more advanced it is still easy to use them and the complexity is about making the right choice.
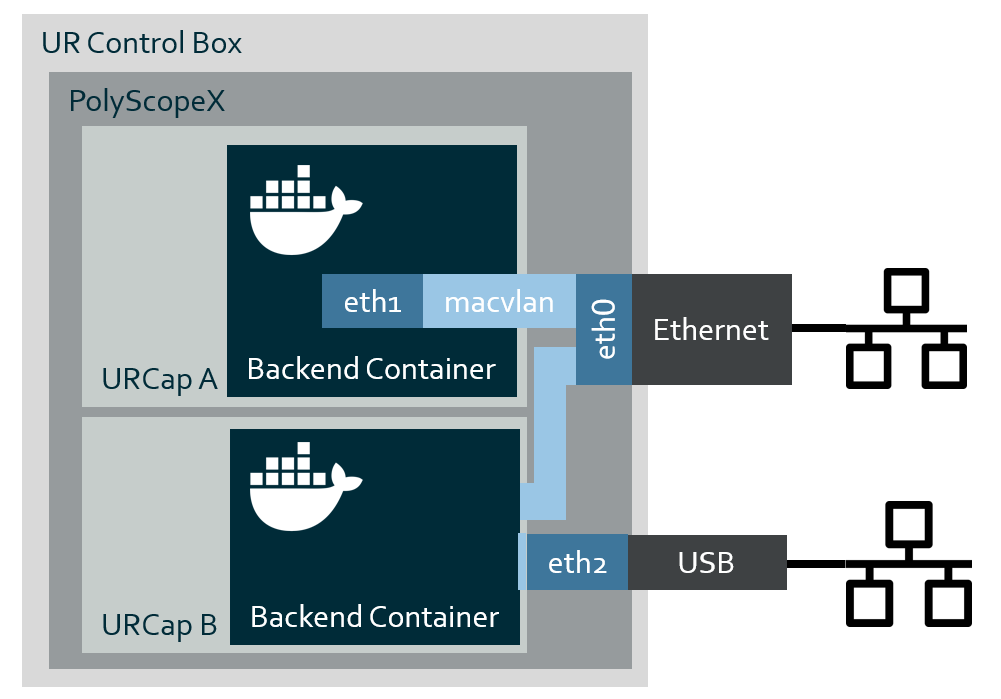
Additional network interfaces can be added to a container either by adding a physical (USB) network adaptor to the control box or virtually with macvlan gaining low level (layer 2) access to the normal ethernet port.
Macvlan provides a virtual network adaptor with its own mac address on the normal control box ethernet port.
This can solve a number of connectivity issues for layer-2 protocols (EtherCAT, EthernetIP, ProfinetRT,…).
It can also aid automatic discovery protocols with a way to broadcasting packets on the physical network which is otherwise not possible as the container is running on a separate (software) network.
The usage of maclvan is also required for cases in which the container needs to manage the IP-address of the network interface independent of the control box IP-address (profinet and more).
A Physical network adaptor has the same use cases as macvlan, but with a few different properties.
By nature it offers dedicated bandwidth isolated completely from the other robot network traffic.
Adding an additional ethernet port (RJ45 plug) can make cabling easier as point-to-point network connection can be done to external equipment without adding a network switch.
Below you will find additional details about the two solutions
Virtual network connections (macvlan)
Enable external communication in the URCaps manifest.yaml networks section
artifacts:
  containers:
    - id: macvlan-flask
      image: macvlan-flask:1.0
      networks:
        - id: "eth1"
          type: macvlan
          description: "Tools network"
External devices can now communicate on the eth1 network. See macvlan How To and the “macvlan” sample.
Physical ethernet connections (USB adaptor)
It is possible to add one or more physical ethernet connections to a URCap container.
artifacts:
  containers:
    - id: network-flask
      image: network-flask:1.0
      devices:
        - type: network
This uses the USB hot-plug system for adding more physical network adaptors. More details about the hot-plug can be found below.
Connecting using USB
A containerised backend contribution provides some builtin capabilities that support the special nature of USB devices being connected to the robot. These specific conditions include:
A wide variety of device types can be connected via USB.
USB devices are likely to be plugged in and unplugged while the robot is operational.
Different USB types
In order to offer the correct USB device in a container, the backend contribution will have to specify which type/class the relevant USB connection must belong to. This is done in the URCap’s manifest.
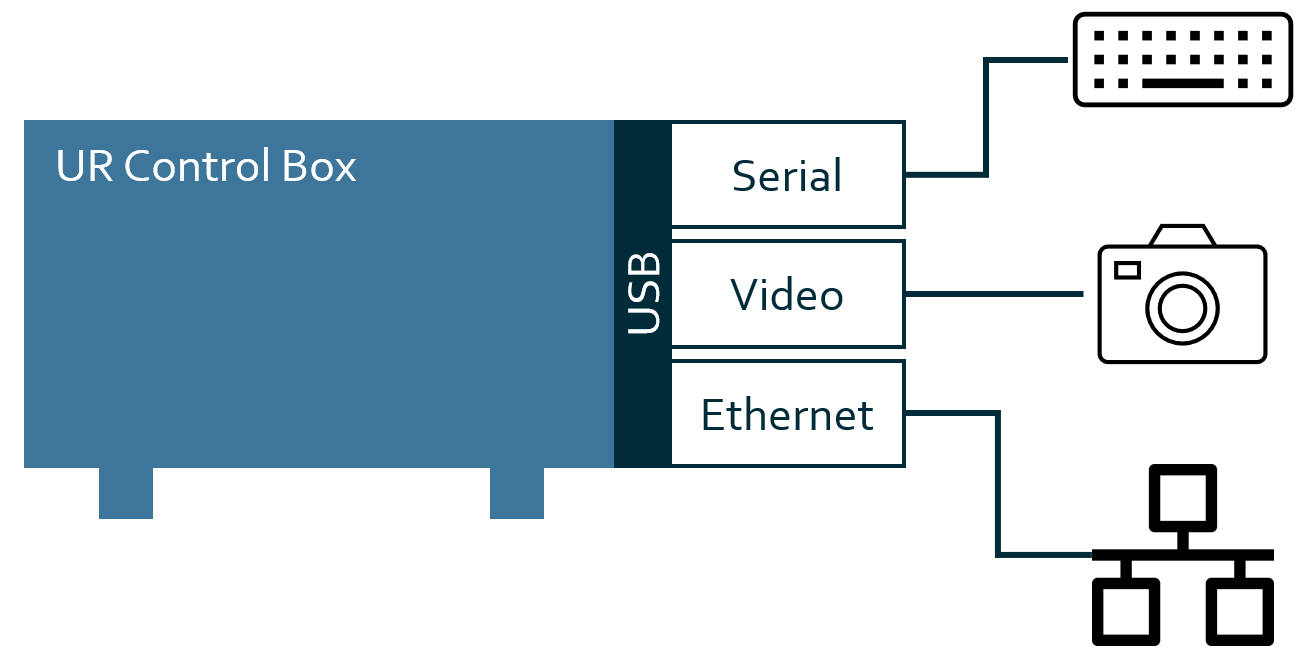
Currently users can choose between the following USB types:
serial: USB to serial device
video: USB to video device
network: USB to ethernet device
This is what it looks like in the manifest, when requesting access to a USB to ethernet connection.
artifacts:
  containers:
    - id: "usb-example"
      image: "usb-example:latest"
      devices:
        - type: network
When this is added to the manifest, any “USB to Ethernet” device connected to the robot will be made available to the backend contribution. The following section explains how the backend contribution accesses the actual device.
Note
Yet another device type is supported in the manifest called “ttyTool”. This is used to request access to the fixed Tool Connector. However since this is not a pluggable device it will not use the same hot plug mechanisms as USB. See Connecting using the Tool Connector to learn how to work with the Tool Connector
Using an USB device from within a containerised backend contribution
Backend contributions support the dynamic addition and removal of USB devices at runtime. When a USB device is connected to the robot, it is made available to backend contributions through a built-in Hotplug mechanism. Similarly, when a USB device is disconnected, the backend contribution receives a Hotplug notification. Additionally, if the robot is rebooted or the backend contribution is restarted, any previously attached USB devices will be reoffered to the contribution as if they were newly connected.
Containerised URCap Hotplug mechanism There are only 2 Hotplug events a backend contribution can receive: “on_device_add” and “on_device_remove”.
The URCap developer must create 2 executable files named “on_device_add” and “on_device_remove” and place them in the root folder of the backend contribution container.
When a USB event happens the Hotplug system will call the user-provided executable with a JSON parameter specifying information on where in the container the device can be accessed and information about the device. see URCapX hook JSON format.
In case of the “on_device_add” the user-provided executable must indicate whether it wants ownership of the device or not. Accepting the device is simply done by return “0” within a timelimit of 10 seconds. In case any other value is returned or the event times out, the backend contribution will not get access to the device and the Hot plug system will fire the event on the next backend contribution requesting this device (if any).
See Serial Device - Hot plug and “devices” sample for a more detailed description on how to work with USB Hotplug.