Using Teach Mode from a Smart Skill
This is a step-by-step guide showcasing how to create a Smart Skill contribution that uses Teach mode.
What is Teach Mode
Teach mode allows users to record robot data while a Smart Skill is activated. Teach Mode is activated and deactivated from the Smart Skill panel. Any Smart Skill contribution can choose to support Teach Mode or not. If Teach Mode is supported by the Smart Skill the user will be able to:
Activate the Smart Skill.
Teach the robot any behavior or movement.
Deactivate the Smart Skill.
After deactivation, the Smart Skill can insert program nodes into the program tree, based on data generated while the user taught a robot behavior during Smart Skill activation.
This Teach Mode example
In this guide a Record Path Smart Skill is created together with a Path Playback Program Node. When this Smart Skill is
activated in Teach Mode, the Smart Skill will put the robot in freedrive and allow the user to move the robot arm. When
the Smart Skill is deactivated, it will create and insert a Path Playback Program Nodein the program tree. When
running the program the Path Playback Program Node will make the robot replay the movement taught during the Smart Skill activation.
Prerequisites
Install and setup the PolyScope X URCap SDK. Also make sure to get the PolyScope X Simulator up and running to enable testing in a later step.
Creating the Smart Skill and program node templates
Use the SDK’s URCap contribution generator to create a template Smart Skill and program node. In the SDK dev container terminal run:
./newurcap.sh
The tool will prompt some questions that must be answered before the templates are generated, below is the input used for the contribution described further below. Feel free to use other values, just make sure to create a Smart Skill and a program node.

After the last question is answered the new URCap project is created in a folder called smart-skill-teach-mode.
Test the generated template contributions
The URCap skeleton does not do much yet, but it can be compiled and run. Just to make sure everything is working so far do the following in a shell to build the new URCap:
cd smart-skill-teach-mode
npm install
npm run build
If everything goes as expected we can try and install the URCap in the simulator. First make sure the simulator is running. In another terminal do:
./run-simulator
After a while the simulator is up and running. This can be confirmed in a Chrome browser by navigating to localhost.
This should load a PolyScope X simulator in the browser.
Back in the terminal previously used for building the URCap install the URCap in the simulator by doing:
npm run install-urcap
Now it should be possible to see a Smart Skill called Record Path Smart Skill in the Smart Skill panel.
Implement the Teach Mode Smart Skill
In the URCap project folder, the Smart Skill implementation can be found on this folder:
smart-skill-teach-mode-frontend/src/app/components/record-path-smart-skill. The implementation consist of 4 files:
record-path-smart-skill.behavior.worker.ts
record-path-smart-skill.component.html
record-path-smart-skill.component.scss
record-path-smart-skill.component.ts See the general Smart Skill guide on the Smart Skill implementation basics, this guide will focus on whats is needed to enable Teach Mode.
Enabling Teach Mode behavior
In the generated Smart Skill behavior worker record-path-smart-skill.behavior.worker.ts the Teach Mode functionality is
commented out by default. We will need to uncomment the default implementation and add the functionality needed for the
Record Path behavior.
Uncomment the import of SmartSkillInstance, SmartSkillsBehaviorAPI, SmartSkillsData from @universal-robots/contribution-api.
CommentNodeand NodeType is used by the default implementation and is not needed for this Smart Skill.
Uncomment the createProgramNode Smart Skill behavior function and delete the function implementation, we will add another implementation
for the record path functionality.
Smart Skill Data recording configuration
It is optional to configure the data that will be recorded during Smart Skill activation. Per default the following data
will be recorded at 100 Hz 'timestamp', 'target_q', 'actual_TCP_pose', 'target_TCP_pose', 'robot_status_bits', 'tcp_offset'.
Note that target_q will always be recorded to enable the default Smart Skill Undo/Redo behavior described later
in this document.
The sample frequency must be between 1 and 500 Hz and the data available to be sampled is defined in the interface
SmartSkillsData, this corresponds to the data available at the
RTDE interface.
This sample includes an example of how to set the data recording configuration. This is done in the required behavior
factory like this:
 factory: () => {
    return {
        type: 'universal-robots-smart-skill-teach-mode-record-path-smart-skill',
        name: 'Record Path Smart Skill',
        parameters: {},
        //Recording frequency
        recordingFrequency: 100,
        //RTDE signals to record
        recordingSignals: ['target_q'],
    };
},
Here the optional parameter recordingFrequency defines the sample frequency and recordingSignals is the list of
data points to be recorded.
Smart Skill execution
When the Smart Skill is activated we would like the robot to go into freedrive so the user is able to move the arm.
The required behavior startExecutionis used to provide the URScript that must be executed during Smart Skill activation.
We put the robot in freedrive like this:
startExecution: (instance) => {
      const builder = new ScriptBuilder();
      builder.addStatements('freedrive_mode()');
      builder.beginWhile('True');
      builder.sync();
      builder.end();
      return builder;
  },
CreateProgramNode Smart Skill behavior
The createProgramNode behavior is exclusively used for Teach Mode. When this behavior is implemented, Teach Mode is enabled. If teach Mode is activated by the user, then this function is automatically called by PolyScope X after the Smart Skill have been deactivated. To recap, this is the flow:
When the Smart skill is started, robot data will be recorded at 100 Hz.
When the Smart skill is stopped this function will be called with the recorded data as input.
Any program node returned from the function will be inserted in the program tree.
The function takes two parameters:
SmartSkillInstance: The Smart Skill node containing its parameters, if any.
SmartSkillsData[]: The data recorded during Smart Skill activation.
For the Record-Path Smart Skill, we want to use the robots freedrive motion taught by the user during Smart Skill
activation. For this purpose we can use the SmartSkillsData.target_q fields in the recorded data. We will then
create a Path-playback-program-nodeand populate it with the motion data and information on the motion sample rate.
After returning the program node it will automatically be inserted in the program tree. We will later modify the program
node so it will create script code that will playback the motion based on the movement data.
This is the function implementation including the helper function for downsampling the data:
import { PathPlaybackProgramNodeNode } from '../path-playback-program-node/path-playback-program-node.node';
...
...
createProgramNode: async (instance: SmartSkillInstance, data: SmartSkillsData[]) => {
    //target Frequency after downsampling
    const downSampledFrequency: number = 5;
    //Array for holding the movement we want to replay, each joint angle set is a number array
    let jointAngles: number[][] = [];
    if (data.length > 0) {
        //Loop over the array of recorded data and select all the target joint angles
        data.forEach((element) => {
            jointAngles.push(element.target_q);
        });
        //Process the data, this could be done using a contributed backend component
        //For this example we simply do a rough downsampling of the data
        jointAngles = simpleDownsampleToFrequency(jointAngles, downSampledFrequency, instance.recordingFrequency);
    }

    const api = new SmartSkillsBehaviorAPI(self);
    // Create a program node to be directly inserted in the program tree.
    const myCreatedNode = (await api.builder.createNode(
        'universal-robots-smart-skill-teach-mode-path-playback-program-node',
    )) as PathPlaybackProgramNodeNode;
    //Pass the processed data to the program node. The program node will use the data to generate script during program execution
    myCreatedNode.parameters.jointAngles = jointAngles;
    myCreatedNode.parameters.sampleFrequency = downSampledFrequency;
    return myCreatedNode;
},

//Simple function to downsample the recorded data
function simpleDownsampleToFrequency(jointAngles: number[][], downSampledFrequency: number, frequency: number) {
    let downsampledData: number[][] = [];
    const factor = Math.floor(frequency / downSampledFrequency);
    for (let x = 0; x < jointAngles.length; x += factor) {
        downsampledData.push(jointAngles[x]);
    }
    //Make sure to the end position is added
    downsampledData.push(jointAngles[jointAngles.length-1]);
    return downsampledData;
}
Undo/Redo in Teach Mode
When Teach Mode is enabled it is possible to add Undo/Redo functionality to the Smart Skill action. This is useful when in Teach Mode multiple Smart Skills are used in sequence and the user want to Undo/Redo a part of this taught sequence.
Undo/Redo in Teach Mode is activated this way:
Activate Teach Mode.
Activate and deactivate any number of Smart Skills.
While still in Teach Mode press the
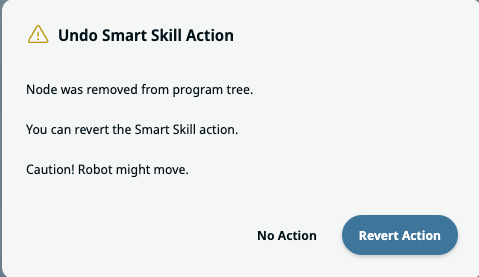
Undobutton near the program tree.Notice that the program node, inserted by the Smart Skill, is removed and a
Undo Smart Skill Actionpopup is shown asking if the user want to undo the Smart Skill action. If confirmed, the Smart Skill action is undone, this might include moving the robot to the configuration it had before the Smart Skill action.Press the
RedobuttonNotice that the program node is reinserted in the program tree and a popup is shown asking if the user want to redo the Smart Skill action. If confirmed, the Smart Skill action is redone, this might include moving the robot to the configuration it had before the Smart Skill action was undone.
If the Smart Skill does not implement its own Smart Skill Action Undo/Redo behavior the default behavior is:
Undo: Move to the first data point recorded during Smart Skill activation.
Redo: Move to the last data point recorded during Smart Skill activation.
This is an example of an Smart Skill Undo popup:
Implementing Smart Skill Undo/Redo
Using the default Smart Skill Undo/Redo behavior might not always be the best solution. For example the direct movement to the first and last data point could pose a risk of the robot colliding with its environment. It is possible for each Smart Skill to implement its own Undo/Redo behavior. As an example this Smarts Skill could be extended to use the taught motion when moving to the first and last data point during Undo/Redo.
For the sake of simplicity this sample only demonstrates how to add the Undo/Redo functions and it simply reimplements the default behavior of moving directly to the first and last data points.
    // Parameters:
    //  instance: This Smart skills node containing its parameter data.
    //  data: Data recorded during Smart skill activation.
    // Return: Promise<ScriptBuilder>

    async undo(instance: SmartSkillInstance, data: SmartSkillsData[]): Promise<ScriptBuilder> {
        const undoScriptBuilder = new ScriptBuilder();
        const targetPosition = data[0]?.target_q;
        undoScriptBuilder.append(buildMoveScript(targetPosition));
        return undoScriptBuilder;
    },

    // Parameters:
    //  instance: This Smart skills node containing its parameter data.
    //  data: Data recorded during Smart skill activation.
    // Return: Promise<ScriptBuilder>

    async redo(instance: SmartSkillInstance, data: SmartSkillsData[]): Promise<ScriptBuilder> {
        const redoScriptBuilder = new ScriptBuilder();
        const targetPosition = data[data.length - 1]?.target_q;
        redoScriptBuilder.append(buildMoveScript(targetPosition));
        return redoScriptBuilder;
    }
Since we are not providing any settings UI to this simple Smart Skill, the other 3 Smart Skill files
(record-path-smart-skill.component.html,record-path-smart-skill.component.scss, record-path-smart-skill.component.ts) can
be left as is. Smart Skill settings UI can be seen in PolyScope X by clicking the Application->Smart Skillbutton. Refer
to The Smart Skill Contribution Howto for an example on how to implement Smart Skill settings.
We now need to implement PathPlaybackProgramNodeNode to perform the motion playback.
Implement the Path Playback Program Node
To keep this example straightforward, the playback functionality will be implemented in a simplified and somewhat rough manner. This is primarily due to the coarse-grained data downsampling performed in the Smart Skill. However the implementation should be enough to visualize that the recorded motion is repeated.
In the URCap project folder, the Program Node implementation can be found on this folder:
smart-skill-teach-mode-frontend/src/app/components/path-playback-program-node. The implementation consist of 6 files:
path-playback-program-node.behavior.worker.ts: This is where we define the script to be executed at runtime.
path-playback-program-node.component.html: We will implement a simple UI just showing a label.
path-playback-program-node.component.scss: Can be left as is, no special styling is used for this example.
path-playback-program-node.component.spec.ts: Can be left as is, this example will not include test examples.
path-playback-program-node.component.ts: Can be left as is, This program node will not have logic besides URscript.
path-playback-program-node.node.ts: We will add the list of joint angles and sample frequency as parameters to this program node.
See the general Creating a Frontend Contribution on the details of creating a program node, this guide will focus on whats is needed for playing back the taught data.
Implement the Program Node data model
In the Smart Skill behavior the recorded data jointAngles and the downsampled frequency sampleFrequency was assigned
to the Playback program node. Now we need to add both the jointAngles and sampleFrequency parameters to the program
node data model. This is done in path-playback-program-node.node.ts. Add the jointAngles: number[][] and
sampleFrequency: number parameters to the program node like this:
export interface PathPlaybackProgramNodeNode extends ProgramNode {
    type: string;
    parameters: {
        jointAngles: number[][];
        sampleFrequency: number;
    };
    lockChildren?: boolean;
    allowsChildren?: boolean;
}
Implement the Playback Program Node behavior
The path-playback program node have one main behavior, it must make the robot move to all the positions defined in the
recorded data. Since we already got the list of wanted robot joint angles in the data model, all there is left is to wrap the
joint angles in URScript movement commands. To contribute to the program we add URscript in the generateScriptCodeBefore
behavior:
const generateScriptCodeBefore = (node: PathPlaybackProgramNodeNode): OptionalPromise<ScriptBuilder> => {
    const scriptBuilder = new ScriptBuilder();
    //move slow and safe into the start position
    scriptBuilder.movej(node.parameters.jointAngles[0], 0.2, 0.3);
    node.parameters.jointAngles.forEach((element) => {
        const timeStep = 1 / node.parameters.sampleFrequency;
        scriptBuilder.addRaw('servoj([' + element.toString() + '], 0,0,' + timeStep + ',0.1,300)');
    });
    scriptBuilder.addRaw('stopj(1)');
    return scriptBuilder;
}
This simple playback is using a series of individual servoj URScript commands targeting the recorded joint angles.
The data sample frequency is used to calculate how much time each movement should take. This
will result in an approximate movement when comparing with the one taught by the user. Note that the movement to the first
datapoint is done using movel at a constant speed and acceleration. This is done to make sure that the robot will move
into the playback start position slow and safe from whatever configuration the robot have prior to the playback.
It is also needed to add the jointAngles and sampleFrequencydata fields to the program nodes created using the
createProgramNode factory behavior. Add the parameters like this:
const createProgramNode = (): OptionalPromise<PathPlaybackProgramNodeNode> => ({
    type: 'universal-robots-smart-skill-teach-mode-path-playback-program-node',
    version: '1.0.0',
    lockChildren: false,
    allowsChildren: false,
    parameters: {
        jointAngles: [],
        sampleFrequency: 10,
    },
});
As a convenience it is easy to add an informative label to the program node, when shown in the program tree. To add a
label that informs on the number of move commands in the program nodes motion change the createProgramNodeLabel
behavior:
const createProgramNodeLabel = (node: PathPlaybackProgramNodeNode): OptionalPromise<string> => node.parameters.jointAngles.length+' moves';
Add Program Node labels
Finally we want to add some labels to the Playback Program node so it´s easy recognizable in the program tree.
Program Node Presenter label
The Program Node UI is defined in its presenter path-playback-program-node.component.html. In this case we just want to
add a label, that allows the user to identify the type of node. Add the label in
path-playback-program-node.component.html:
@if (contributedNode && robotSettings) {
<div class="inline-component">
    <ur-label size="large" [label]="'presenter.label' | translate"></ur-label>
</div>
}
The presenter is what will be shown when the user selects the program node in the programming tree.
Define the presenter.label in the translation json files at smart-skill-teach-mode-frontend/src/assets/i18n:
{
  "program": {
    "tree": {
      "nodes": {
        "my-company-smart-skill-teach-mode-path-playback-program-node": "Path Playback Program Node"
      }
    }
  },
  "presenter": {
    "label": "Path Playback Program Node"
  },
  "smart-skills": {
    "my-company-smart-skill-teach-mode-record-path-smart-skill": {
      "title": "Record Path Smart Skill"
    }
  }
}
Program Node label when not selected
As is the case with all program nodes the label shown when not selected in the program tree is per default defined by the
key program.tree.nodes.[programNodeID]. As can be seen in the above json file, the default key/value for this example
is program.tree.nodes.my-company-smart-skill-teach-mode-path-playback-program-node = “Path Playback Program Node”.
In the program tree, a combined label will be displayed, consisting of this predefined text and the result generated by
the createProgramNodeLabel behavior function. For instance: “Path Playback Program Node: 20 moves”.
Build, Install and Test the URCap
The Teach Mode Smart Skill is done and can be built and tested using the same steps as done when testing the template contribution. The URCap UI can be tested in simulation, but for testing the record/playback of movements a real robot is needed: In a terminal rebuild the URCap
npm run build
The URCap can be installed in the simulator like this:
npm run install-urcap
Or it can be installed on a real robot using a USB stick.
Testing the URCap on a robot
Installing the URCap on a robot and activate the robot arm.
1. Go to the Smart Skills panel.
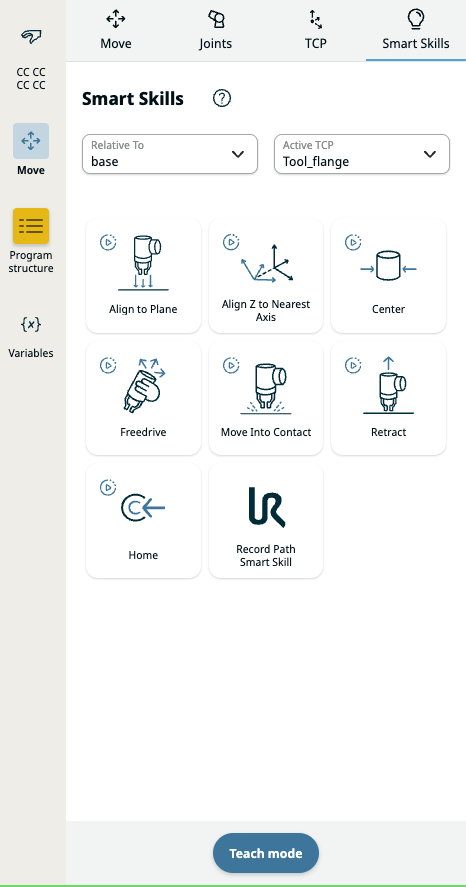
2. Enable Teach mode by clicking the Teach mode button.
3. Activate the Record Path Smart Skill.
You’ll notice the button remains selected, indicating that the robot is in freedrive mode. This will continue until the Smart Skill is deactivated. At this point, data is actively being recorded.
4. Teach some motion by moving the robot arm.
5. After the wanted motion have been taught, deactivate the Smart Skill by clicking it again
Optionally deactivate Teach mode by clicking the Teach mode button again.
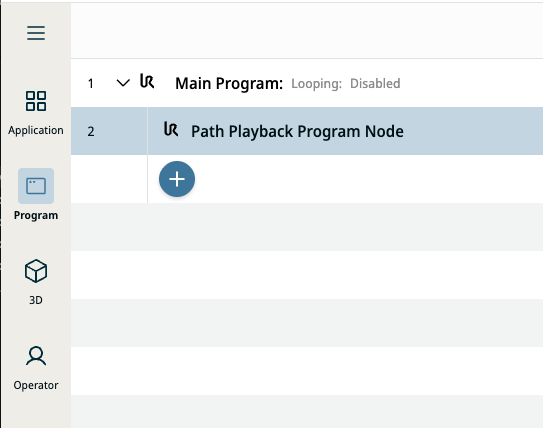
6. Observe the program node inserted in the program tree
Go to the program tree and observe that a Path Playback Program Node have been inserted and is selected in the
program tree.
 .
.
7. Play the program.
Observe that the robot arm approximately performs the same motion as taught in step 4.