Assembling the URDF
The ur_description package provides macro files to generate an instance of a Universal Robots arm. We’ll use this to create a custom workcell with a ur20 inside. In this section we will only go into detail about the URDF / xacro files, not the complete package structure. Please see the description package source code for all other files assembling the description package.
Workcell description
 1<?xml version="1.0"?>
 2<robot name="my_robot_cell" xmlns:xacro="http://ros.org/wiki/xacro">
 3
 4  <xacro:include filename="$(find my_robot_cell_description)/urdf/my_robot_cell_macro.xacro"/>
 5
 6  <xacro:arg name="ur_type" default="ur20"/>
 7  <xacro:arg name="joint_limits_parameters_file" default="$(find ur_description)/config/$(arg ur_type)/joint_limits.yaml"/>
 8  <xacro:arg name="kinematics_parameters_file" default="$(find ur_description)/config/$(arg ur_type)/default_kinematics.yaml"/>
 9  <xacro:arg name="physical_parameters_file" default="$(find ur_description)/config/$(arg ur_type)/physical_parameters.yaml"/>
10  <xacro:arg name="visual_parameters_file" default="$(find ur_description)/config/$(arg ur_type)/visual_parameters.yaml"/>
11
12  <link name="world"/>
13  <!--This will create the scene where the robot is located in-->
14  <xacro:my_robot_cell
15    parent="world"
16    ur_type="$(arg ur_type)"
17    joint_limits_parameters_file="$(arg joint_limits_parameters_file)"
18    kinematics_parameters_file="$(arg kinematics_parameters_file)"
19    physical_parameters_file="$(arg physical_parameters_file)"
20    visual_parameters_file="$(arg visual_parameters_file)"
21    >
22      <origin xyz="0 0 1" rpy="0 0 0" />
23  </xacro:my_robot_cell>
24
25</robot>
Let’s break it down:
First, we’ll have to include the macro to generate our custom workcell:
<xacro:include filename="$(find my_robot_cell_description)/urdf/my_robot_cell_macro.xacro"/>
This line only loadeded the macro for generating the robot workcell.
We will need to provide some parameters to our workcell in order to parametrize the arm. Therefore, we need to declare certain arguments that must be passed to the macro.
  <xacro:arg name="ur_type" default="ur20"/>
  <xacro:arg name="joint_limits_parameters_file" default="$(find ur_description)/config/$(arg ur_type)/joint_limits.yaml"/>
  <xacro:arg name="kinematics_parameters_file" default="$(find ur_description)/config/$(arg ur_type)/default_kinematics.yaml"/>
  <xacro:arg name="physical_parameters_file" default="$(find ur_description)/config/$(arg ur_type)/physical_parameters.yaml"/>
  <xacro:arg name="visual_parameters_file" default="$(find ur_description)/config/$(arg ur_type)/visual_parameters.yaml"/>
The workspace macro contains all items within the workcell including the robot arm. If you are not experienced in writing URDFs, you may want to refer to this tutorial. The macro’s content is generated using
  <link name="world"/>
  <!--This will create the scene where the robot is located in-->
  <xacro:my_robot_cell
    parent="world"
    ur_type="$(arg ur_type)"
    joint_limits_parameters_file="$(arg joint_limits_parameters_file)"
    kinematics_parameters_file="$(arg kinematics_parameters_file)"
    physical_parameters_file="$(arg physical_parameters_file)"
    visual_parameters_file="$(arg visual_parameters_file)"
    >
      <origin xyz="0 0 1" rpy="0 0 0" />
  </xacro:my_robot_cell>
Here, a world link is created, and the robot workcell is created relative to the world link.
Workcell macro
The workcell macro is defined in the following manner:
 1<?xml version="1.0"?>
 2<robot xmlns:xacro="http://ros.org/wiki/xacro">
 3  <xacro:include filename="$(find ur_description)/urdf/ur_macro.xacro"/>
 4
 5  <xacro:macro name="my_robot_cell" params="
 6    parent
 7    *origin
 8    ur_type
 9    joint_limits_parameters_file
10    kinematics_parameters_file
11    physical_parameters_file
12    visual_parameters_file
13    ">
14
15    <joint name="table_base_joint" type="fixed">
16      <xacro:insert_block name="origin" />
17      <parent link="${parent}" />
18      <child link="table" />
19    </joint>
20
21    <link name="table">
22      <visual>
23        <geometry>
24          <mesh filename="package://my_robot_cell_description/meshes/fzi_table.dae"/>
25        </geometry>
26        <origin rpy="0 0 0" xyz="0.75 0.5 -1"/>
27      </visual>
28      <collision>
29        <geometry>
30          <mesh filename="package://my_robot_cell_description/meshes/fzi_table.dae"/>
31        </geometry>
32        <origin rpy="0 0 0" xyz="0.75 0.5 -1"/>
33      </collision>
34    </link>
35
36    <link name="monitor">
37      <visual>
38        <geometry>
39          <mesh filename="package://my_robot_cell_description/meshes/171005_Motek_Monitor_L.dae"/>
40        </geometry>
41      </visual>
42      <collision>
43        <geometry>
44          <mesh filename="package://my_robot_cell_description/meshes/171005_Motek_Monitor_L.dae"/>
45        </geometry>
46      </collision>
47    </link>
48    <joint name="base_to_monitor" type="fixed">
49      <parent link="table"/>
50      <child link="monitor"/>
51      <origin xyz="0.2 0.6 0"/>
52    </joint>
53
54    <material name="white">
55      <color rgba="1 1 1 1"/>
56    </material>
57
58    <link name="wall">
59      <visual>
60        <geometry>
61          <mesh filename="package://my_robot_cell_description/meshes/wall.dae"/>
62        </geometry>
63      </visual>
64      <collision>
65        <geometry>
66          <box size="4.44 0.1 2.5"/>
67        </geometry>
68      </collision>
69    </link>
70    <joint name="base_to_wall" type="fixed">
71      <parent link="table"/>
72      <child link="wall"/>
73      <origin xyz="1.25 1.5 0.5"/>
74    </joint>
75
76    <link name="robot_mount"/>
77    <joint name="base_to_robot_mount" type="fixed">
78      <parent link="table"/>
79      <child link="robot_mount"/>
80      <origin xyz="0.845 0.85 0" rpy="0 0 ${pi}" />
81    </joint>
82
83    <!--This will create the specific robot-->
84    <xacro:ur_robot
85      name="${ur_type}"
86      tf_prefix="${ur_type}_"
87      parent="robot_mount"
88      joint_limits_parameters_file="${joint_limits_parameters_file}"
89      kinematics_parameters_file="${kinematics_parameters_file}"
90      physical_parameters_file="${physical_parameters_file}"
91      visual_parameters_file="${visual_parameters_file}"
92    >
93      <origin xyz="0 0 0" rpy="0 0 0" />
94    </xacro:ur_robot>
95  </xacro:macro>
96
97</robot>
This macro provides an example of what a custom workcell could resemble. Your workspace will likely vary from this one. Please feel free to modify this portion of the URDF to match your own setup. In this instance, our workspace comprises a table in front of a wall, featuring a monitor, and the ur20 robot arm mounted on top.
Ensure that your custom workcell includes the parent link, which must be passed to the ur_robot macro. In this example, we chose to create a link named robot_mount.
1    <link name="robot_mount"/>
2    <joint name="base_to_robot_mount" type="fixed">
3      <parent link="table"/>
4      <child link="robot_mount"/>
5      <origin xyz="0.845 0.85 0" rpy="0 0 ${pi}" />
6    </joint>
After that we are finally able to actually create the robot arm by calling the macro.
 1    <xacro:ur_robot
 2      name="${ur_type}"
 3      tf_prefix="${ur_type}_"
 4      parent="robot_mount"
 5      joint_limits_parameters_file="${joint_limits_parameters_file}"
 6      kinematics_parameters_file="${kinematics_parameters_file}"
 7      physical_parameters_file="${physical_parameters_file}"
 8      visual_parameters_file="${visual_parameters_file}"
 9    >
10      <origin xyz="0 0 0" rpy="0 0 0" />
11    </xacro:ur_robot>
Note that the origin argument is transmitted in a different manner than the other arguments.
Before we can test our code, it’s essential to build and source our Colcon workspace:
#cd to your colcon workspace root
cd ~/colcon_ws

#source and build your workspace
colcon build
source install/setup.bash
We can view our custom workspace by running:
#launch rviz
ros2 launch my_robot_cell_description view_robot.launch.py
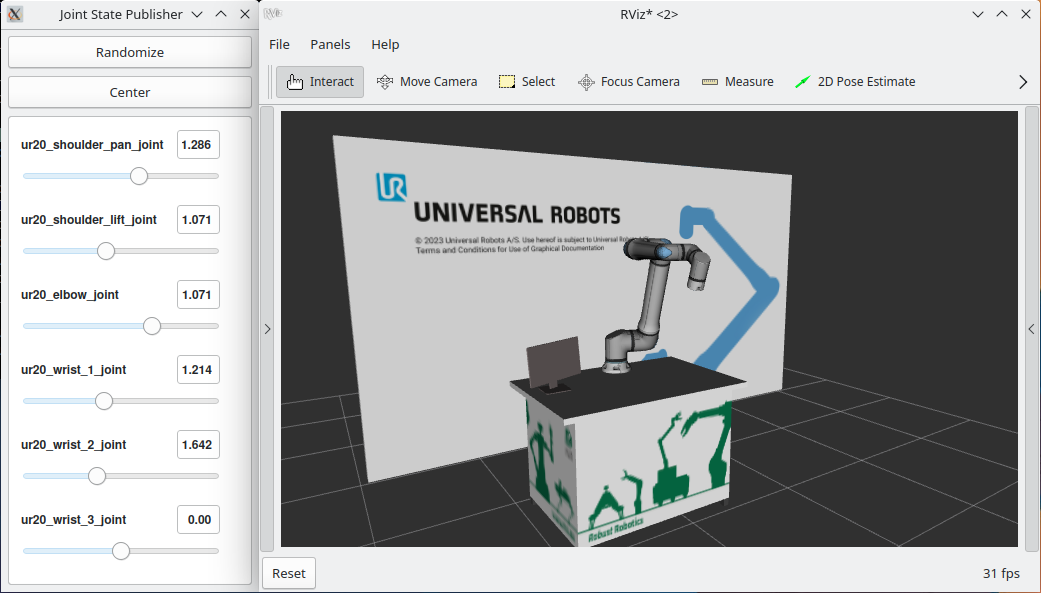
Use the sliders of the joint_state_puplisher_gui to move the virtual robot around.
It should look something like this:
