Detection
Warning
The AI Accelerator requires ROS 2 Humble, so PolyScope X 10.12.1 is the latest compatible release. PolyScope X 10.13 and later use ROS 2 Jazzy and are not currently supported.
A pick and place is a common task in manufacturing and production lines. In this demo the camera identifies objects and recognizes object bounding box. The robot’s movements are planned accordingly.
The objective of this demo is to program robot to pick parts randomly placed on a table after preparing the training data and training. This demo shows how to identify an object and determine its location and orientation.
This example is limited to 2D detection of parts, in many cases full 6 DOF Pose Estimation will be preferable for picking objects, so also check out the Pose Estimation example that uses NVIDIA Foundation Pose.
Auto Annotation for object detection
v2 includes a new tool for auto annotating data for training a detector, which can be found here: Auto Annotation for object detection.
The manual data annotation steps using online tool from v1 descibed at the bottom of this page are now deprecated, but still valid if for some reason the auto annotation tool does not meet your needs.
To train the model
Train the model using the Console UI (you can restart it from
./scripts/run_example_detection.sh)Click “Train model” in the Console UI.
The training of the model can take anything from several minutes, depending on the total number of images and labeled objects in each image.
Loading the model
Click “Load model” in the Console UI.
This will load the model from the highest numbered checkpoint folder under ros/data/models/rtdetr-active. The highest number may not be the latest model however, so check the output of the training command above to check which checkpoint has just been created.
Renaming the higher numbered checkpoint directories to start with, for example ignore_ is one approach to make the system load the checkpoint you want.
This same highest checkpoint will also be loaded automatically when starting any example using the detector.
Testing the model
Run the
run_example_detection.shon the compute module.Load the model in rtdetr_active column of the Console UI.
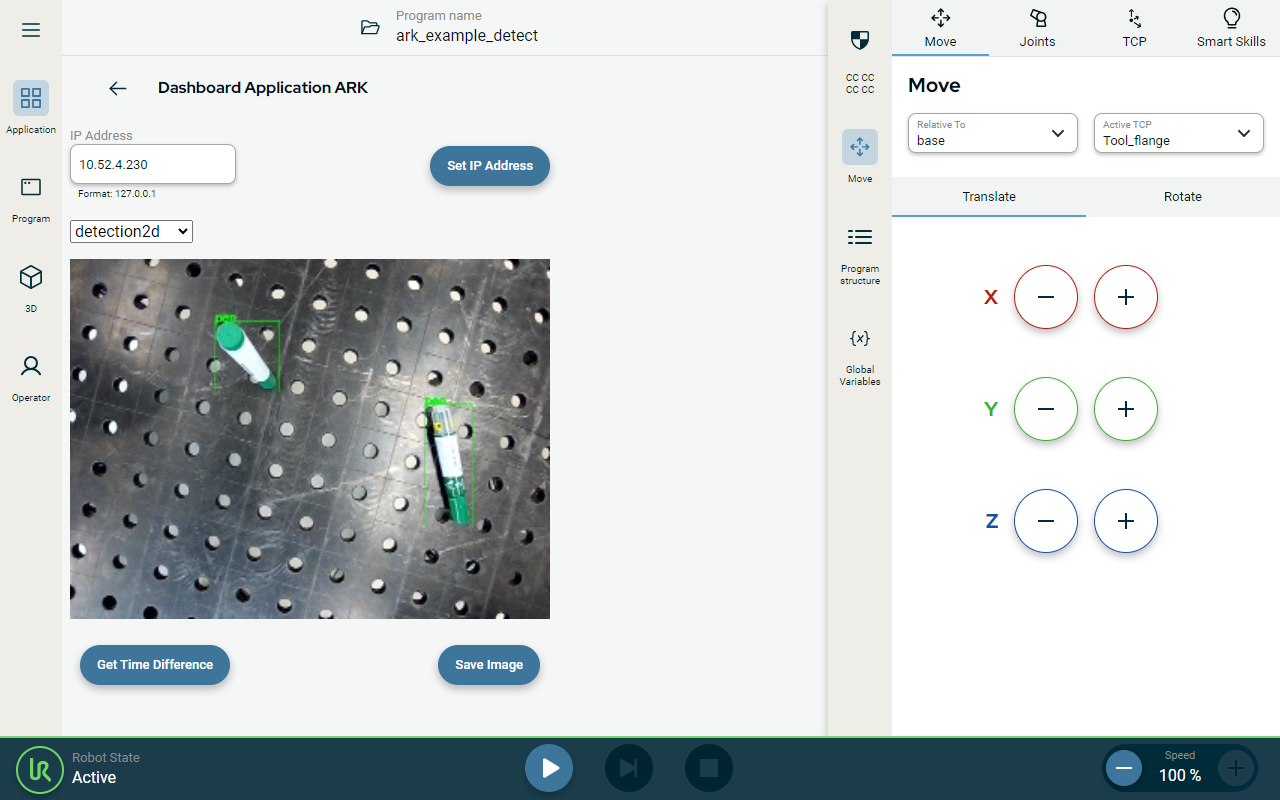
Open AI Accelerator Dashboard on the robot, and select detection2d view from the drop-down.
Place an object within camera view.
Click “Detect” in the Console UI .
If an object is recognized a green bounding box will appear in camera view.
Example of using object location
Warning
A specific robot position stored in this program. Before executing this program check that robot can freely move to detect_wp and poses no risks.
Set program speed to 10%
Select detect_wp and tap Move Here
Verify that there are no obstructions
If necessary, Freedrive robot to a new position and save it as detect_wp
Please keep the following in mind:
Adjust the table height in the program script node labeled “local pose …” The default currently is that the table is 2.5 cm below the base of the robot.
Adjust the part height in the launch file
./launch/run_example_detection.launch.pyin the env_manager_node. The default is 4.5 cm tall.Add an active tcp end_effector before setting any of the waypoints so the proper reference is used when deciding where to place the arm relative to the object.
Included with AI AcceleratorSDK you can find example of a robot program using the recognition results.
On the robot open aia_example_detect program, copied from the compute module.
Place objects within camera view.
Run the program.
Robot moves to waypoint detect_wp and captures an image. The function ark_detection_retrieve() returns robot pose matching the bounding box of the recognized object via planar pose estimation
If a pre-trained object is recognized, the robot will move to position 150 mm above an object. If multiple objects are recognized, robot will randomly choose one.