Using RViz
Warning
The AI Accelerator requires ROS 2 Humble, so PolyScope X 10.12.1 is the latest compatible release. PolyScope X 10.13 and later use ROS 2 Jazzy and are not currently supported.
RViz (Robot Visualization) is the 3D visualization tool used with the AI Accelerator SDK. It shows the live robot model, TF frames, collision geometry, camera point clouds, and FoundationPose / detection markers so you can verify calibration, scene setup, and perception results before or while running examples.
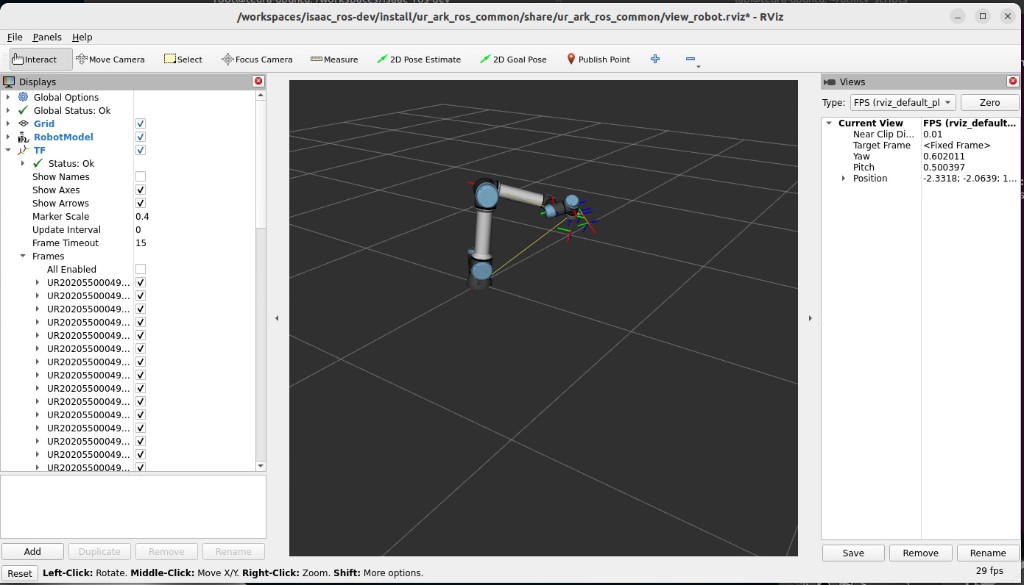
Typical RViz window: Displays (left) with Grid, RobotModel, and TF; 3D view of the robot with RGB axes on frames; Views (right). The config loaded by default is based on view_robot.rviz / view_fp.rviz under ros/config.
Prerequisites
Enter the SDK Docker container as described in the SDK article:
cd ~/aia_sdk/ros
./scripts/run_sdk_setup.sh
In
ros/config/config.yaml, set:Robot serial (e.g.
UR20205500049) — TF frame prefixes and robot model must match your robotrobot_type(e.g.ur5e,ur10e)ros_domain_idmatching PolyScope X
Power on the robot and enable ROS 2 so joint states / TF are published.
If the serial or robot type is wrong, the RobotModel may be missing or TF frames will not line up with PolyScope X.
How to start RViz
From /workspaces/isaac_ros-dev (or ~/aia_sdk/ros mapped into the container), run:
./scripts/run_rviz.sh
By default this launches the FoundationPose-oriented view (view_ur.fp.launch.py → view_fp.rviz), which includes robot model, TF, collision markers, point cloud, and 3D detection displays.
To start the simpler robot/TF/collision view without the FP-oriented config:
./scripts/run_rviz.sh --no-fp
That uses view_ur.launch.py with view_robot.rviz.
Window layout
Area |
Use |
|---|---|
Displays |
Enable/disable Grid, RobotModel, TF, MarkerArrays (collision), PointCloud2, Detection3DArray, etc. |
3D view |
Orbit / pan / zoom the scene. RGB axes are TF frames when TF → Show Axes is on. |
TF → Frames |
Expand to see all frames (often prefixed with your robot serial). Turn individual frames on/off; useful for camera, tags, and detected parts. |
Views |
Camera type (Orbit / FPS) and viewpoint. |
Toolbar |
Interact, Move Camera, Select, Focus Camera, Measure, etc. |
Mouse (status bar): left-click rotate, middle-click pan, right-click zoom.
What to use RViz for
1. Robot model and joint motion
RobotModel follows the live robot from
/robot_descriptionand joint states.Confirm the arm pose in RViz matches the teach pendant as you jog or run programs.
3. Collision models (path planning / cuMotion)
Collision geometry for cuMotion is defined in a YAML file pointed to by collision_file in config.yaml (e.g. /workspaces/isaac_ros-dev/data/collision.yaml or collision_advanced.yaml).
Start RViz:
./scripts/run_rviz.shIn a second terminal inside the container:
source install/setup.bash
source install_isaac_pkgs/setup.bash
ros2 launch ur_cumotion collision_model_visualizer.launch.py
Or start an example that already includes the visualizer, e.g. ./scripts/run_example_path_planning.sh.
Displays such as Collision Objects, Collision Spheres, Tool Meshes, and Part Collision Spheres / Part Meshes show the scene used for planning.
Editing and saving the collision YAML updates the RViz markers live.
cuMotion itself only reloads collision geometry when that planner process is restarted — visualization can be ahead of the planner.
Tool meshes in YAML help you author spheres in RViz; only spheres (not meshes) are used for collision checking.
4. Point cloud
With the FP / sensor view (run_rviz.sh without --no-fp), enable PointCloud2 to see the depth camera cloud in the robot base frame.
Useful for:
Aligning collision boxes/planes with the real table and obstacles
Checking whether objects are in range / visible to the camera
Spotting depth issues (e.g. camera closer than ~20 cm on Orbbec 335Lg)
5. FoundationPose and detection markers
In the FP config, displays such as Detection3DArray and mesh Marker / MarkerArray show estimated object poses using the mesh you gave FoundationPose.
Overlay the mesh on the point cloud to validate pose quality.
If the mesh floats or sinks relative to the cloud, check calibration, lighting, distance, and mesh alignment (see Pose Estimation).
Config files (reference)
File |
Role |
|---|---|
|
Robot + TF + collision marker displays ( |
|
Adds point cloud, Detection3DArray, FP markers (default) |
|
Lighter setup-oriented layout |
|
Wrapper that sources installs and launches the view |
Launch files: ros/launch/view_ur.launch.py, ros/launch/view_ur.fp.launch.py.
Tips
Run RViz before or alongside example scripts so you can watch TF and markers as pipelines start.
If RobotModel or TF is empty: check robot power, ROS 2 enabled,
ros_domain_id, and serial inconfig.yaml.Fixed Frame in Global Options should match your robot base frame (serial-prefixed
…_base/ similar). If the scene looks empty or “off in space,” fix the Fixed Frame first.Scene construction / nvblox uses a separate RViz layout (
scene_construction.rviz) when that tool is launched — not the same asrun_rviz.sh.