Upgrade from 1.x
Warning
The AI Accelerator requires ROS 2 Humble, so PolyScope X 10.12.1 is the latest compatible release. PolyScope X 10.13 and later use ROS 2 Jazzy and are not currently supported.
This guide is only for AI Accelerator boxes that are still running 1.x firmware and need to move to 2.x. Upgrading across the 1.x → 2.x boundary is a manual, one-time procedure that erases the disk, so it is not done through the normal in-app update.
Before doing anything else, follow Step 1 to confirm which version you are on. If you are already on 2.x, stop — you do not need this guide. Use downloads from Centercode for normal 2.x updates instead.
Step 1: Check which version you are on
Do this first. It tells you whether you need to upgrade at all, so you don’t erase a box that is already on 2.x.
Connect a screen, mouse and keyboard to the AI Accelerator box.
Power on the box and wait for the desktop to load. Sign in as
lab/easybotif prompted (see SDK).Open a terminal on the AI Accelerator (CTRL + ALT + T).
Run this command:
curl -s http://localhost/universal-robots/platform/system/v1/versions
Example output on a 2.x box:
{"additionalVersions":[{"name":"bsp","version":"2.0.5"}],"systemVersion":"2.0"}
Or, for a more readable view, run:
curl -s http://localhost/universal-robots/platform/system/v1/versions | python3 -m json.tool
Example formatted output:
{
    "additionalVersions": [
        {
            "name": "bsp",
            "version": "2.0.5"
        }
    ],
    "systemVersion": "2.0"
}
Interpret the result:
What you see |
What it means |
What to do |
|---|---|---|
A JSON response containing |
You are already on 2.x |
Stop. No upgrade needed. Use Centercode for normal 2.x downloads / updates. |
The command fails, hangs, returns an error, or reports |
You are on 1.x |
Continue with Step 2. |
Tip
Look for the "systemVersion" field. If it is present and starts with 2., you are on 2.x and do not need this upgrade guide. If the command errors out or returns nothing, you are on 1.x.
Step 2: What you will need
To perform the 1.x → 2.x upgrade you will need:
A screen, mouse and keyboard connected to the AI Accelerator box.
Access to centercode to download the upgrade tool and the update file.
If the AI Accelerator is not on the internet: a USB disk and a separate PC with an internet connection to download the files and copy them onto the USB disk.
The upgrade is done in two parts: first you download and install the upgrade tool, then you run the actual upgrade with the correct update file.
Warning
Upgrading the AI Accelerator erases the disk. Make sure you have backed up any user data before you continue.
Step 3: Download and install the upgrade tool
Download
upgrade-tool.debfrom centercode.If you downloaded it on a separate PC, copy the file onto a USB disk and connect the USB disk to the AI Accelerator.
Open a terminal on the AI Accelerator (CTRL + ALT + T).
Install the tool by running (replace
<path to upgrade-tool.deb>with the actual location, e.g. the USB disk):
sudo dpkg -i <path to upgrade-tool.deb>
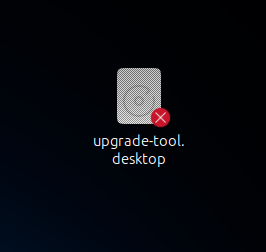
Locate the upgrade-tool icon on the Desktop.
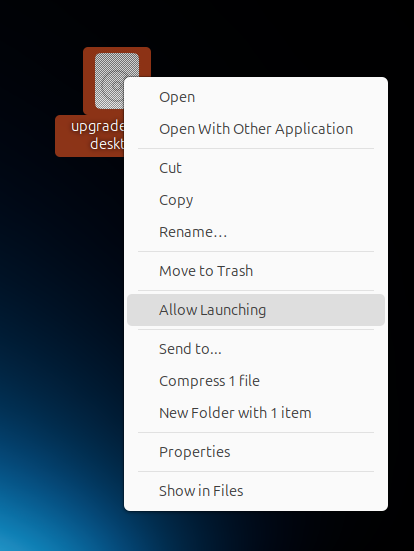
Right-click the icon and choose Allow Launching.
Step 4: Find out which update file you need
The correct .aiup update file depends on which 1.x version you are coming from.
Open a terminal on the AI Accelerator (CTRL + ALT + T).
Run this command:
head -1 /etc/nv_tegra_release
Read the
REVISIONvalue from the output and map it to your version:
|
AI Accelerator version |
Update file to download |
|---|---|---|
|
1.0.4 |
|
|
1.0.5 |
|
The output line looks similar to this (only the REVISION field matters here):
# R36 (release), REVISION: 4.0, GCID: ..., BOARD: generic, EABI: aarch64, DATE: ...
Note
This REVISION mapping is only meaningful on 1.x boxes and is used purely to pick the right .aiup file. It is not a reliable way to tell 1.x from 2.x — use the Step 1 version check for that.
Step 5: Run the upgrade
Warning
This step erases the disk. Confirm your backup from Step 2 is complete before continuing.
Download the correct
.aiupfile (update-from-<version>.aiup) identified in Step 4 from centercode.If you used a separate PC, copy the
.aiupfile onto the USB disk and connect it to the AI Accelerator.
Double-click the upgrade-tool on the Desktop to launch it.
Follow the on-screen instructions to locate and select the
.aiupfile.Start the upgrade and wait for it to finish.
The upgrade takes approximately 10 minutes and ends with a reboot.
After the upgrade
Once the box has rebooted, you can confirm the upgrade succeeded by repeating the check in Step 1 — the command should now return "systemVersion":"2.0" (or higher).
Finally, follow the hardware steps in the Hardware Manual, then continue with the SDK setup (including URCapX on the robot) and the examples.