SDK
Warning
The AI Accelerator requires ROS 2 Humble, so PolyScope X 10.12.1 is the latest compatible release. PolyScope X 10.13 and later use ROS 2 Jazzy and are not currently supported.
The AI Accelerator SDK lets you build your own AI applications based on technology from Universal Robots and NVIDIA. It installs a Docker environment with NVIDIA Isaac Manipulator and related tools so you can run the included examples and develop your own applications.
Before you start
Complete these checks before installing the SDK.
1. Confirm the compute module is on 2.x
This SDK requires AI Accelerator software 2.x (BSP 2.0.5 or later). If you are still on 1.x, upgrade first — see Upgrade from 1.x.
Connect a screen, mouse and keyboard to the AI Accelerator.
Open a terminal (CTRL + ALT + T).
Run:
curl -s http://localhost/universal-robots/platform/system/v1/versions
Example output on a supported 2.x box:
{"additionalVersions":[{"name":"bsp","version":"2.0.5"}],"systemVersion":"2.0"}
For a clearer view:
curl -s http://localhost/universal-robots/platform/system/v1/versions | python3 -m json.tool
Example formatted output:
{
    "additionalVersions": [
        {
            "name": "bsp",
            "version": "2.0.5"
        }
    ],
    "systemVersion": "2.0"
}
Result |
Meaning |
Next step |
|---|---|---|
|
You are on 2.x |
Continue with this SDK guide. |
Command fails, hangs, or returns no |
You are on 1.x |
Follow Upgrade from 1.x, then return here. |
2. Hardware and network prerequisites
Keyboard, mouse, and display connected to the compute module.
AI Accelerator connected to the internet (required for the first SDK install / Docker pull).
Robot powered on and on the same subnet as the compute module.
Warning
In this version of the AI Accelerator software the primary IP address of the compute box is fixed to 192.168.0.100. Changing that address will break the system. Configure the robot on the same subnet (192.168.0.x, subnet mask 255.255.255.0).
Default compute box login
Factory defaults for the Jetson host (desktop login and SSH):
Username |
|
Password |
|
IP (2.x) |
|
ssh lab@192.168.0.100
Use this password when the SDK installer asks for the compute module password, and for sudo on the box unless you have changed it.
Setup of the SDK
On the robot (PolyScope X)
The robot must run PolyScope X 10.12.1. If it does not, follow Update PolyScope X to 10.12.1 before continuing.
Open Settings.
Navigate to Secure Shell and enable SSH access.
Navigate to Services, enable ROS2, tap the input box, and select a ROS domain ID greater than 0 (for example 1–5). Remember this value — you will set the same ID on the compute module.
Navigate to Network and configure an IP address in the same range as the compute box (
192.168.0.x) with subnet mask255.255.255.0.Install the AI Accelerator URCapX packages on the robot (see Install URCapX on the robot below). Do this before you run the SDK
.debinstaller on the compute module.
Install URCapX on the robot
These three packages must be installed on the PolyScope X robot controller (not on the Jetson). Download them from Centercode, or copy them from a USB disk.
File |
Role |
|---|---|
|
AI Accelerator Core (camera manager, calibration, settings UI) |
|
Orbbec Gemini 335Lg camera driver URCapX |
|
AI Accelerator SDK URCapX (URScript preamble / |
Install them in that order.
Copy the three
.urcapxfiles onto a USB disk.Insert the USB disk into the teach pendant.
On PolyScope X, open Settings → URCaps.
Install each file, one at a time:
aia_core-2.1.33.urcapxorbbec-gemini-v335Lg-1.3.10.urcapxaia-sdk-6.6.10.urcapx
Wait until each install finishes (backend containers start). Confirm all three URCaps are listed as installed.
If PolyScope X prompts for a restart, restart the robot, then confirm the URCaps are still present.
Note
aia-sdk-6.6.10.urcapx is the robot package. The compute module still uses the SDK .deb (see below). Those version numbers are not required to match digit-for-digit.
From a development PC with the robot in remote control, you can also push a package with install-urcap from @universal-robots/urcap-utils:
install-urcap aia_core-2.1.33.urcapx --host 192.168.0.10
install-urcap orbbec-gemini-v335Lg-1.3.10.urcapx --host 192.168.0.10
install-urcap aia-sdk-6.6.10.urcapx --host 192.168.0.10
Replace 192.168.0.10 with the robot IP you set under Settings → Network.
On the compute module
Confirm the robot is powered on and reachable on the same network.
Open a terminal (CTRL + ALT + T).
Update packages and install helpers:
sudo apt update
sudo apt install chrony sshpass
Download the SDK package from Centercode (or copy it from a USB disk if you downloaded it on another PC). The file name looks like
aia-sdk_<VERSION>_all.deb.Install it (replace the path and file name with yours):
sudo dpkg -i ~/aia-sdk_6.6.15_all.deb
Answer the installer prompts:
When asked about time sync, answer y.
Enter the robot IP (default is often
192.168.0.10).Enter the robot password.
Enter the compute module password (
easybotunless you changed it).When prompted, reboot the robot.
On the robot teach pendant, open the hamburger menu (top left) → About, and note the robot serial number.
Edit
~/aia_sdk/ros/config/config.yamlon the AI Accelerator and set:robot_serial— serial number prepended withUR, for exampleUR20255500010ros_domain_id— same domain ID you enabled on PolyScope Xrobot_type— robot model, for exampleur5e
Start (or enter) the SDK container:
cd ~/aia_sdk/ros
./scripts/run_sdk_setup.sh
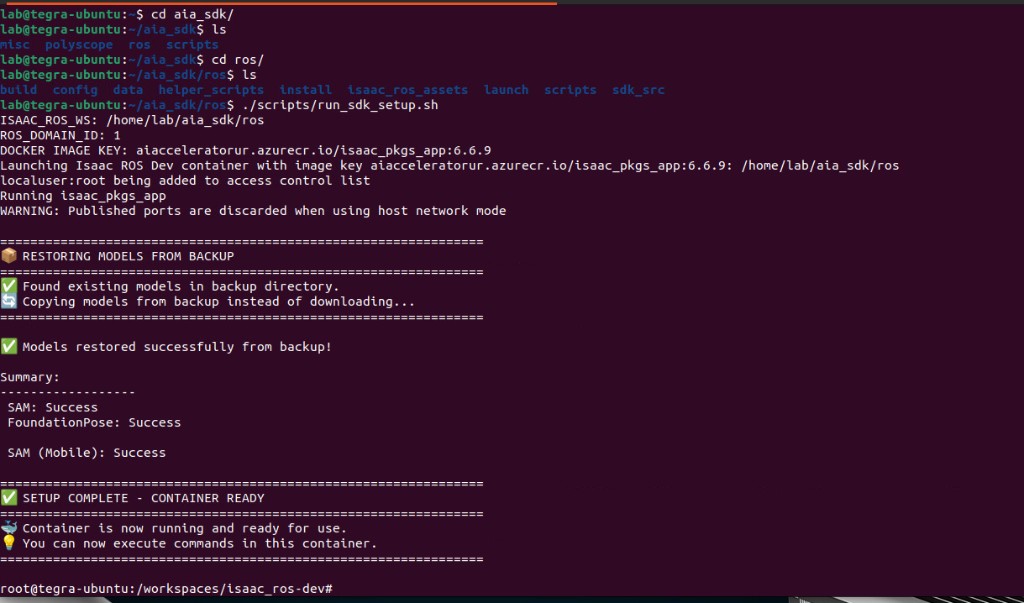
When setup finishes successfully, you should see output similar to the following (models restored, component checks, and SETUP COMPLETE - CONTAINER READY), and your prompt will be inside the Docker container:
For CPU/GPU load, temperature, and power mode on the compute box, see Jetson compute utilities.
After the first successful setup, use the same script to enter the Docker container again. Later runs skip the heavy setup steps if they have already completed.
How the container uses NVIDIA Isaac ROS (RT-DETR, SAM, FoundationPose, cuMotion) is explained in How PandaI uses NVIDIA Isaac.
After setup
You are ready to use the tools, run the examples, and program with the URScript API. All tools and examples must be executed from inside the SDK Docker container:
cd ~/aia_sdk/ros
./scripts/run_sdk_setup.sh
Example PolyScope programs are in ~/aia_sdk/polyscope/programs on the compute module. Copy them to a USB disk and import them into PolyScope X.